Unveiling the Zest: Crafting the Perfect Homemade Key Lime Pie
Ever dreamt of biting into a slice of pure sunshine, a dessert that perfectly balances tart and sweet, creamy and crisp? That dream becomes a delicious reality when you master the art of making your own Key Lime Pie from scratch. Forget those overly sweet, artificially flavored imposters; the true magic lies in the vibrant, aromatic key lime itself. Preparing this iconic dessert at home not only guarantees unparalleled freshness and flavor but also offers a satisfying culinary journey, transforming simple ingredients into a show-stopping treat that will impress every palate. Dive in, and let’s unlock the secrets to a truly unforgettable Key Lime Pie.
Ingredients & Kitchen Tools
Gather your culinary arsenal! Here’s what you’ll need to create this zesty masterpiece:
- For the Graham Cracker Crust:
* 1 ½ cups (about 150g) Graham cracker crumbs: Finely crushed for a sturdy base.
* ¼ cup (50g) granulated sugar: Adds a touch of sweetness to the crust.
* ½ cup (113g) unsalted butter, melted: Binds the crumbs together for a firm crust.
- For the Key Lime Filling:
* 1 (14-ounce) can sweetened condensed milk: The sweet and creamy foundation of the pie.
* ½ cup (120ml) fresh key lime juice: The star of the show! Use fresh, not bottled, for authentic flavor.
* 4 large egg yolks: Provide richness and help set the filling.
* 1 tablespoon key lime zest: Enhances the citrus aroma and flavor.
- Optional Garnish:
* Whipped cream: For a luscious, airy topping.
* Extra key lime zest or thin slices: For visual appeal and an extra flavor kick.
- Kitchen Tools:
* 9-inch pie plate: The perfect vessel for your pie.
* Mixing bowls (medium and large): For combining ingredients.
* Whisk: To ensure a smooth, lump-free filling.
* Measuring cups and spoons: For precise ingredient measurements.
* Rubber spatula: For scraping bowls and spreading the crust.
* Microplane zester: For finely grating key lime zest.
* Citrus juicer: To efficiently extract key lime juice.
Prep Time & Cooking Schedule
Crafting the perfect Key Lime Pie requires a bit of patience, but the hands-on time is surprisingly minimal.
- Prep Time: 20 minutes (includes crushing grahams, zesting, and juicing)
- Bake Time: 15-17 minutes
- Chill Time: Minimum 4 hours, preferably overnight
This pie relies heavily on a good chill to set properly, so plan accordingly. Start it the day before you intend to serve it for the best results. The extended chilling allows the vibrant flavors to meld and the filling to achieve its signature creamy, yet firm, texture.
Step-by-Step Instructions
Follow these steps to create a truly irresistible Key Lime Pie:
1. Preheat Oven & Prepare Crust: Preheat your oven to 350°F (175°C). In a medium bowl, combine the graham cracker crumbs and granulated sugar. Pour in the melted butter and mix until all crumbs are moistened. Press this mixture firmly into the bottom and up the sides of your 9-inch pie plate. You can use the bottom of a flat glass or measuring cup to achieve a compact, even crust. Bake for 8-10 minutes, or until lightly golden. Remove from oven and let cool completely on a wire rack.
2. Whisk the Filling Ingredients: In a large bowl, whisk together the sweetened condensed milk, egg yolks, and key lime zest until well combined and smooth. This is where the magic happens – the acidity of the key lime juice will begin to “cook” the egg yolks, thickening the mixture without traditional heat.
3. Add the Key Lime Juice: Gradually whisk in the fresh key lime juice. Continue whisking until the mixture thickens slightly and is uniformly blended. Avoid over-whisking, as this can incorporate too much air.
4. Bake the Pie: Pour the key lime filling into the cooled graham cracker crust. Bake for 15-17 minutes, or until the center is just set but still slightly wobbly. Overbaking can lead to a rubbery texture, so keep a close eye on it.
5. Cool & Chill: Remove the pie from the oven and let it cool completely on a wire rack at room temperature. Once cooled, transfer it to the refrigerator and chill for at least 4 hours, or preferably overnight, to allow the filling to fully set and the flavors to deepen.
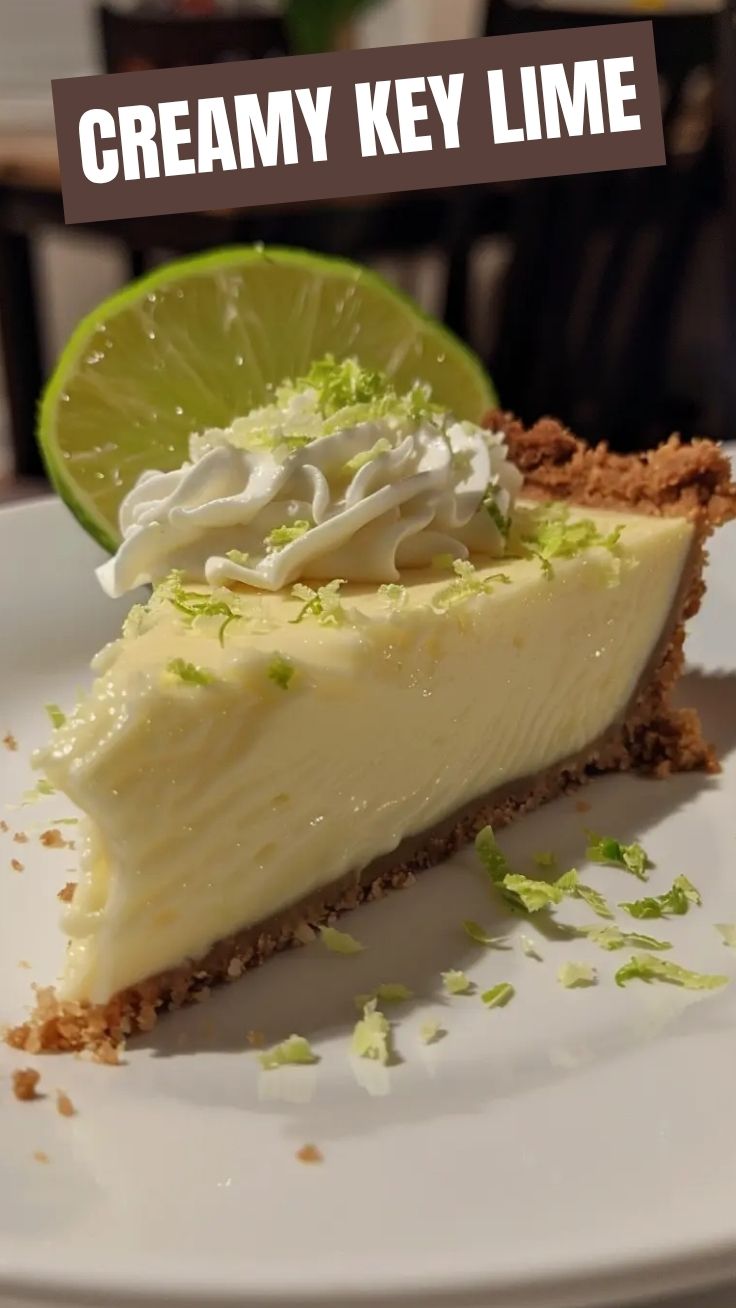
6. Garnish & Serve: Before serving, top with fresh whipped cream and a sprinkle of extra key lime zest or thin key lime slices for an elegant finish.
Nutritional Benefits & Advantages
Beyond its delightful taste, Key Lime Pie, particularly when made with fresh ingredients, offers a few surprising advantages. Key limes are packed with Vitamin C, an essential antioxidant that supports immune health and collagen production. While it’s a dessert, the presence of real fruit juice and dairy provides some calcium and protein. Making it at home also allows you to control the quality of ingredients, opting for organic or locally sourced options, and avoiding artificial flavors or preservatives often found in store-bought versions.
Tips, Variations & Cooking Advice
- For the Perfect Crust: For an extra crispy crust, you can briefly blind bake it for 5-7 minutes before adding the filling.
- Zest First, Then Juice: Always zest your key limes before juicing them. It’s much easier!
- Freshness is Key: The flavor of your pie hinges on fresh key lime juice. Bottled juice simply won’t yield the same vibrant, authentic taste.
- Meringue Topping: Instead of whipped cream, consider a delicate meringue topping for a classic look and a different textural contrast. Beat egg whites with sugar until stiff peaks form, then spread over the baked and chilled pie and lightly brown with a kitchen torch or under the broiler.
- Gluten-Free Version: Use gluten-free graham crackers for the crust to make this a gluten-friendly dessert.
- Individual Servings: Bake in ramekins or small tart pans for delightful individual Key Lime Pie portions.
Common Mistakes to Avoid
- Using Bottled Key Lime Juice: This is the most critical mistake. The flavor difference is monumental. Invest in fresh key limes!
- Overbaking the Filling: This can lead to a dense, rubbery texture instead of the desired creamy, smooth consistency. The pie should still have a slight “jiggle” in the center when removed from the oven.
- Not Chilling Long Enough: Patience is a virtue with this pie. Insufficient chilling results in a runny, unset filling.
- Not Pressing the Crust Firmly: A loosely packed crust will be crumbly and fall apart when sliced.
- Ignoring the Zest: The zest contains concentrated oils that contribute significantly to the authentic key lime flavor profile. Don’t skip it!
Storage & Meal Prep Tips
Leftover Key Lime Pie should be stored in an airtight container in the refrigerator. It will stay fresh for 3-4 days. For longer storage, you can freeze individual slices (without the whipped cream topping) for up to 1 month. Wrap slices tightly in plastic wrap and then aluminum foil. Thaw in the refrigerator overnight before serving. This pie is an excellent make-ahead dessert, perfect for entertaining as it benefits from ample chilling time.
Conclusion
There you have it – the definitive guide to crafting a truly extraordinary homemade Key Lime Pie. From the perfectly crisp graham cracker crust to the tangy, creamy filling infused with the unmistakable essence of fresh key lime, this recipe is more than just a dessert; it’s an experience. Embrace the joy of creating something so wonderfully delicious from scratch. We encourage you to try this recipe, savor every bite, and share your culinary successes with us! What’s your favorite part about making this iconic pie?
FAQs
Q1: Can I use regular limes instead of key limes?
A1: While you can technically use regular limes, the flavor will be different. Regular limes are more acidic and less aromatic than key limes. For the authentic Key Lime Pie taste, seek out true key limes.
Q2: How do I know if my pie is baked sufficiently without overcooking?
A2: The pie is done when the edges are set and a slight jiggle remains in the very center when gently shaken. It will firm up completely during the chilling process.
Q3: My crust is too crumbly. What went wrong?
A3: This usually means there wasn’t enough melted butter to bind the crumbs, or the mixture wasn’t pressed firmly enough into the pie plate. Ensure you use the exact butter quantity and really compact the crust.
Q4: Can I make the filling ahead of time and store it?
A4: It’s best to prepare the filling and bake the pie somewhat concurrently. While the filling can be made an hour or two ahead, the acid from the key lime juice will continue to “cook” the eggs, so it’s not ideal for long-term storage in liquid form.
Q5: What if I don’t have a microplane for zesting?
A5: You can use the fine side of a box grater, but be careful not to grate the white pith underneath the zest, as it can be bitter.