From Flat to Fantastic: Unlocking the Magic of the Homemade Dutch Baby Pancake
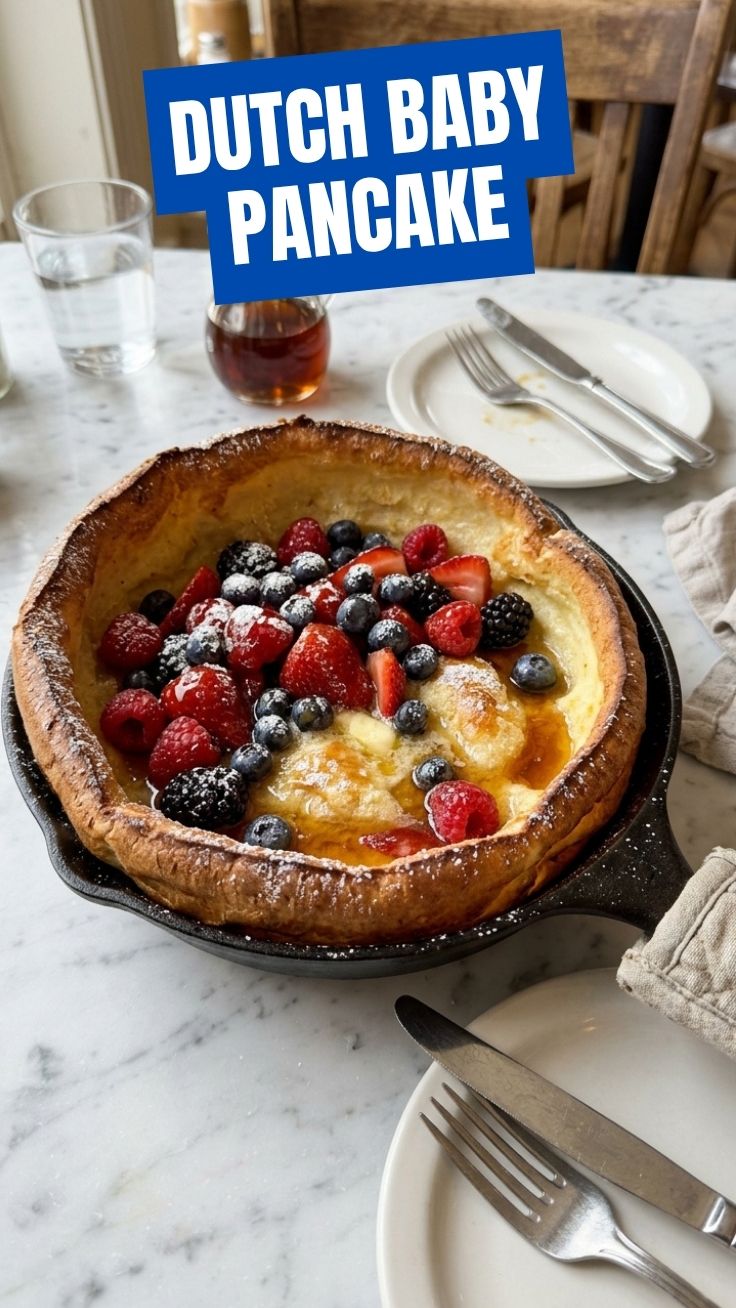
Have you ever dreamt of a breakfast that feels simultaneously gourmet and effortlessly achievable? A dish that puffs up dramatically, offering a custardy interior and a crispy, golden-brown exterior, all with minimal fuss? Look no further than the remarkable Dutch Baby Pancake. This oven-baked marvel, often likened to a giant popover or Yorkshire pudding, is a true breakfast showstopper that transcends the ordinary. Preparing a Dutch Baby Pancake at home not only guarantees freshness and control over ingredients but also transforms a simple morning meal into a delightful culinary experience. And if you’re a fan of the similarly impressive German Pancake, you’ll find much to love in its Dutch cousin. This blog post will guide you through crafting the perfect rendition, ensuring a spectacular result every time.
Ingredients & Kitchen Tools
Gather your culinary essentials to embark on this delicious journey:
- Eggs (4 large): The backbone of this dish, providing structure and richness.
- Milk (½ cup): Whole milk is preferred for a richer flavor, but 2% will also work. Acts as a liquid base.
- All-Purpose Flour (½ cup): Standard flour provides the necessary structure.
- Granulated Sugar (1 tbsp): Adds a touch of sweetness to balance the flavors.
- Salt (¼ tsp): Enhances all other flavors.
- Unsalted Butter (2 tbsp): Essential for greasing the pan and creating crispy edges.
- Vanilla Extract (½ tsp – optional): Offers a comforting aroma and flavor.
- Toppings (optional): Fresh berries, powdered sugar, maple syrup, lemon juice, fruit compote.
Kitchen Tools:
- 10-inch Cast Iron Skillet: Crucial for even heat distribution and that signature crisp texture. A heavy oven-safe skillet or pie dish can be a substitute, but cast iron is highly recommended.
- Blender or Whisk: For achieving a smooth, lump-free batter. A blender is quickest and creates more aeration.
- Mixing Bowl: If using a whisk.
- Measuring Cups & Spoons: For accurate ingredient portions.
- Oven Mitts: For safely handling the hot skillet.
Prep Time & Cooking Schedule
- Prep Time: 5 minutes
- Cook Time: 20-25 minutes
- Resting Time (for ingredients): 10-15 minutes (optional, but recommended for more puff)
The beauty of the Dutch Baby Pancake lies in its efficiency. The prep is minimal, allowing for a quick morning start. Allowing your ingredients to come to room temperature for 10-15 minutes can lead to a more impressive puff. Plan to have your oven preheated and ready to go for immediate baking after mixing.
Step-by-Step Instructions
Let’s get this show on the road and bake a truly spectacular Dutch Baby Pancake! Here’s how to achieve that perfect rise and golden hue:
1. Preheat & Prepare Skillet: Preheat your oven to 425°F (220°C). Place the cast iron skillet with the butter inside into the oven as it preheats. This allows the butter to melt and the pan to get wonderfully hot, preventing sticking and promoting a crisp crust.
2. Blend the Batter: In a blender, combine the eggs, milk, flour, sugar, salt, and vanilla extract (if using). Blend on high speed for about 30 seconds to 1 minute, until the batter is smooth and a little foamy. Alternatively, whisk vigorously in a mixing bowl until completely smooth. The goal is to incorporate air.
3. Pour & Bake: Carefully remove the piping hot skillet from the oven using oven mitts. Swirl the melted butter around the pan to coat the bottom and sides thoroughly. Immediately pour the batter into the hot skillet.
4. Watch the Magic Happen: Place the skillet back into the oven and bake for 20-25 minutes, or until the edges are deep golden brown and dramatically puffed up, and the center is set. Resist the urge to open the oven door during the first 15 minutes, as this can cause the pancake to deflate.
5. Serve Immediately: Once baked, remove the Dutch Baby Pancake from the oven. It will begin to deflate almost immediately, and that’s perfectly normal! Serve hot with your favorite toppings. If you’re a fan of a delicate and airy texture, similar to a classic German Pancake, this exact baking method is key.
Nutritional Benefits & Advantages
Beyond its stunning appearance, the Dutch Baby Pancake offers some valuable nutritional aspects. Eggs are a powerhouse of protein and essential amino acids, contributing to satiety and muscle health. Milk provides calcium for strong bones and vitamin D. While it contains carbohydrates from flour and sugar, you can manage the overall nutritional impact by choosing wholesome toppings like fresh fruit, which adds fiber and vitamins. It’s a relatively simple dish without excessive added fats, making it a comforting and satisfying meal.
Tips, Variations & Cooking Advice
- For a Savory Twist: Omit the sugar and vanilla extract. After baking, top with sautéed mushrooms, herbs, cheese, or even smoked salmon and crème fraîche.
- Gluten-Free Version: Substitute the all-purpose flour with a 1:1 gluten-free baking blend that contains xanthan gum.
- Dairy-Free Option: Use a full-fat unsweetened plant-based milk (like almond or oat milk) and a plant-based butter alternative.
- Citrus Zest: Add a teaspoon of lemon or orange zest to the batter for a brighter flavor profile.
- Portion Control: While often made as a large communal dish, you can make smaller individual Dutch Babies in smaller oven-safe vessels (like ramekins). Adjust baking time accordingly.
Common Mistakes to Avoid
- Cold Ingredients: Using cold eggs and milk can hinder the pancake’s ability to puff up impressively. Let them come to room temperature for 10-15 minutes.
- Not Preheating the Skillet: This is critical! A hot skillet creates the instant sizzle and steam needed for the dramatic rise and crispy edges.
- Opening the Oven Door: Resisting the urge to peek during the first 15 minutes of baking is vital for maintaining the internal temperature and allowing the pancake to fully puff.
- Overmixing the Batter: While you want a smooth batter, overmixing can develop the gluten too much, leading to a tougher pancake. Blend just until smooth.
- Serving Cold: Dutch Babies are best served immediately after coming out of the oven. The puff is temporary, and the warm, custardy interior is at its peak.
Storage & Meal Prep Tips
A freshly baked Dutch Baby Pancake is truly a treat to be enjoyed right away. However, if you do have leftovers:
- Refrigeration: Store any cooled leftover portions in an airtight container in the refrigerator for up to 2-3 days. The texture will not be as light and airy as fresh.
- Reheating: Reheat in a preheated oven at 350°F (175°C) for about 5-10 minutes, or until warmed through. Microwaving is not recommended as it can make it rubbery.
- Freezing: Freezing is generally not recommended as the texture degrades significantly upon thawing. It’s best to enjoy this dish fresh.
Conclusion
The Dutch Baby Pancake is a testament to the fact that sometimes, the simplest ingredients can create the most extraordinary results. With just a few basic kitchen staples and a hot oven, you can whip up a breakfast or brunch item that consistently delights and impresses. Its ability to transform from a simple batter into a towering, golden creation makes it a truly magical experience. So, ditch the traditional stack of flapjacks for a day and give this magnificent, puffy pancake a try. Whether you prefer the dramatic rise of a Dutch Baby Pancake or the equally delicious thinness of a German Pancake, this recipe is sure to become a cherished addition to your home cooking repertoire. Share your creations and favorite toppings in the comments below!
FAQs
Q1: Why didn’t my Dutch Baby puff up much?
A1: Common reasons include cold ingredients, not preheating the skillet sufficiently, or opening the oven door too early. Ensure your oven is accurately calibrated as well.
Q2: Can I prepare the batter ahead of time?
A2: While you can mix the dry ingredients and wet ingredients separately, it’s best to combine them just before baking for the best puff. The leavening action starts immediately.
Q3: What kind of skillet is best for a Dutch Baby?
A3: A 10-inch cast iron skillet is ideal due to its excellent heat retention and non-stick properties once seasoned. Any heavy, oven-safe skillet or pie dish can work in a pinch.
Q4: Can I use different flours?
A4: All-purpose flour yields the classic texture. While you can experiment with other flours (like whole wheat or pastry flour), they may affect the puff and structure differently. Gluten-free 1:1 blends work well.
Q5: What are the best toppings for a Dutch Baby?
A5: Powdered sugar, fresh berries, sliced fruit, maple syrup, lemon juice, whipped cream, or fruit compotes are classic choices. For savory, consider herbs, cheese, or sautéed vegetables.